Journey with Confidence RV GPS App RV Trip Planner RV LIFE Campground Reviews RV Maintenance Take a Speed Test Free 7 Day Trial ×


Reply
 
Thread Tools Search this Thread Display Modes
 
Old 03-09-2018, 04:11 PM   #1
Seasonal Camper
 
Biggles607's Avatar
 
Join Date: Jan 2017
Location: Florida
Posts: 389
Dexter E-Z Flex rubber equalizer suspension upgrade

Hands up all those who have undertaken something that looks like to should take a couple of hours and it ended up taking all day…….?


OK, ALL of you can put your hands down now, this is not quite one of those, but it so easily could have been.


I bought the ‘E-Z Flex heavy duty’ rubber suspension linkage upgrade kit from ‘etrailer’ a couple of weeks ago after soliciting your advice in these very pages. Thanks again to everyone who chimed in, your input was greatly appreciated and it made me a more enlightened buyer.


The kit in the box, consists of the two equalizer units with the three bushes (center where it mounts to the chassis and the two that attach to the front and rear leaf springs) already installed. Score.

The shackles, (all four of them look like they were engineered for a battleship or some similar behemoth) too come with the ‘wet bolts’ press fit into one side of them. Excellent.


After checking that the quantity of loose ‘wet bolts’ and bronze bushings was correct I put the box aside until I had a window of opportunity to install everything.


Today was perfect. The Florida weather has been blistering already, but this week it cooled down somewhat, nothing like up North, but cool nevertheless. If you’re stuck up there in the middle of the snow, my heart goes out to you. Been there, done that.


My wife likes me the shape I am, so she insists I employ the ‘Belt AND Braces’ approach to anything remotely dangerous, ie getting under ‘Harvey’ with the wheels off. It’s a sound attitude, and I wouldn’t do it any other way.


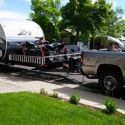
I have a couple of 3 ton bottle jacks with built in ratcheting axle stands. I had a local engineering shop make me a couple of extensions so I can use them to level or lift directly under Harvey’s chassis.


Either jack will comfortably lift one side and both wheels off the ground, but to follow my rule, I placed them both under one side about two feet either side of the wheels. After jacking Harvey up and removing the wheels, I placed them under the frame which was clear of the ground by exactly their diameter figuring if the jack/s fail it’ll sink only onto the wheels. Belt AND Braces.


I studied a video of someone doing the exact replacement posted on the etrailer website. It all looked so simple and straightforward. (it really is, but things don’t always behave like they do in movies)


His sequence was to drop the center equalizer, replace it with the new E-Z Flex unit, then tackle the opposite ends of the springs where they bolt to the chassis. This didn’t work for me and I struggled for far too long trying to align the new wet bolts through the chassis hangers. But hold on, I jumped ahead.


Following the video, I removed the wheels and began taking stuff apart. I had doused the all the bolts the day before with a quality penetrating fluid. I was surprised at how difficult the bolts were to remove, but nowhere near as horrified as I was at the quality of the factory installed nylon bushes.


OMG they’re crap.


I’ve put about 7,000 miles on Harvey since buying him brand new off the lot in December 2016. Already the bushes were almost worn through, the one in the photo is a relatively good one. They popped out with a push from a screwdriver, I am disappointed, they're so soft I could crush them between a finger and thumb.


For those who didn’t consider this a worthwhile upgrade, after what I found on my 2016 TT, I urge you to at least inspect your suspension bushing. I doubt a failure here would be in itself dangerous, noisy perhaps, but the potential for misalignment of axles could lead to tire failures and that’s a different matter altogether. I’ll get off my soapbox right now.


The driver’s side took me about three hours, including jacking, greasing and torqueing down. Three quarters of what I anticipated. After a break for lunch it was on to the other side.


This time after supporting the chassis as before, I removed all the bolts from the equalizer, and those from both ends of the springs. To my amazement, I had it all stripped in under thirty minutes. Result.


I should mention that the instructions suggest hammering the new bushes into the spring ends. This is not as easy as it sounds as the springs are, well, springy. A steel block behind them would help but I haven’t got three hands, or a steel block for that matter.


What I do have is a big ‘Gee’ clamp. Using a short bolt the same diameter as the inside of the bushing to protect the end from burring over or deforming in anyway, I used the clamp to press the bushings home. They look so much better than factory already.


I installed the E-Z Flex to the center hanger first, hand tightening the nut on the back, then the chassis hanger ends of the springs with their respective new ‘wet bolts’ to their hangers. This left the springs disconnected only at the equalizer. By placing a small trolley jack under each axle where the ‘U’ bolts secure it to the spring, I could accurately raise the axle until the spacing between the E-Z Flex and the spring matched the two ‘wet bolts’ already pressed into one side of the shackle. The other side of the shackle was then fitted and the nuts hand tightened. Easy peasy.


I should mention, in the photo above, taken doing the first side, the shackles are not correctly aligned as the end of the spring to the right is not yet connected to the frame hanger. Which is where I had all the trouble and wasted a lot of time.

The entire second side took an hour, so my guesstimate of four hours for the job was spot on, but I have a feeling it could so easily have gone all pear shaped and taken six or eight.


Therefore, in theory, if I had to do it all again, now I know what I’m doing, it should take just two hours.


Haa haa haa ha arrggh.
__________________
Biggles
2015 Toyota Tundra Dbl Cab 5.7 V8
2017 Zinger Z-1 291RL "Harvey'
Biggles607 is offline   Reply With Quote
Old 03-09-2018, 06:23 PM   #2
Site Team
 
mark5w's Avatar
 
Join Date: Sep 2012
Location: PA
Posts: 5,724
Very nice write up. Just ordered my Mor ryde wet bolt kit tonite.
Super price; $65.00 for tandem axles. Got them from a company called rvpartspro on ebay.

Just one question on your install. Didn't you want to install the zerk fittings from the inside of the shackle?

Ps, if you're available, I will be installing mine when the weather breaks up here in PA. I'll let you know.
__________________
Mark & Susan
Lehighton, Pennsylvania

EAGLE HT FIFTH WHEEL | 30.5CKTS - '13 Ford F150 SCREW - PullRite Superslide - Roadmaster Active Suspension
Member - "Northeast Adventures RV Rally Group" & "Mason-Dixon Bunch"
mark5w is offline   Reply With Quote
Old 03-09-2018, 06:34 PM   #3
New Camper
 
Join Date: Feb 2018
Location: MD
Posts: 4
Excellent write up and pictures. I plan to do the same with our trailer. We have the "secure stance"axles, which makes the equalizer distance 14". I haven't found where Dexter makes them this wide, so I'll go with another brand (name escapes me at the moment). Your post helped me decide that I will do the job myself, utilizing your "Belts and Braces" philosophy.
__________________
Paul
2011 ZT 25SB
TV. 2006 F350 Deisel
RoadRat is offline   Reply With Quote
Old 03-09-2018, 08:10 PM   #4
Full Time Camper
 
Steve7's Avatar
 
Join Date: Sep 2015
Location: Nv
Posts: 628
Quote:
Originally Posted by mark5w View Post
Very nice write up. Just ordered my Mor ryde wet bolt kit tonite.
Super price; $65.00 for tandem axles. Got them from a company called rvpartspro on ebay.

Just one question on your install. Didn't you want to install the zerk fittings from the inside of the shackle?

Ps, if you're available, I will be installing mine when the weather breaks up here in PA. I'll let you know.
Mark, I’ve heard of placing the zerks in or out, depending on the wheel interference. I think they stay cleaner inside, and that’s what I did. Also, place the grease holes on the wet bolts in the 3-9 position for easier greasing.
__________________
Steve & Sue
2017 Grand Design 297RSTS Travel Trailer
2017 Ford F-350 Lariat Crew Cab diesel 6.7 SW LB 11,500 lb GVWR package
Former: Crossroads ST26RB
Steve7 is offline   Reply With Quote
Old 03-09-2018, 08:11 PM   #5
Full Time Camper
 
Steve7's Avatar
 
Join Date: Sep 2015
Location: Nv
Posts: 628
Nice write up Biggles! Second side always goes quicker.
__________________
Steve & Sue
2017 Grand Design 297RSTS Travel Trailer
2017 Ford F-350 Lariat Crew Cab diesel 6.7 SW LB 11,500 lb GVWR package
Former: Crossroads ST26RB
Steve7 is offline   Reply With Quote
Old 03-10-2018, 05:02 AM   #6
Seasonal Camper
 
Biggles607's Avatar
 
Join Date: Jan 2017
Location: Florida
Posts: 389
Thanks Mark,

You're absolutely correct in that I did consider installing the zerk fitting on the inside. However, once I started doing the installation, I realized I can get to all of them easily with my grease gun this way.

What time should I come over......do I need to bring any tools?
__________________
Biggles
2015 Toyota Tundra Dbl Cab 5.7 V8
2017 Zinger Z-1 291RL "Harvey'
Biggles607 is offline   Reply With Quote
Old 03-10-2018, 05:14 AM   #7
Seasonal Camper
 
Biggles607's Avatar
 
Join Date: Jan 2017
Location: Florida
Posts: 389
Thanks Steve.

You're right, they will no doubt stay cleaner on the inside, and that was my intended orientation. But two things changed that.

The amount of wrestling I had to do to line the wet bolts and holes up was much easier to achieve from outside being upright rather than laying down underneath from the inside, and the access I have to re-grease with the wheels on from outside outweighed the benefit of keeping the zerk fitting grime free.

If I'd done the second side first, would the whole job have only taken two hours, I wonder. LOL
__________________
Biggles
2015 Toyota Tundra Dbl Cab 5.7 V8
2017 Zinger Z-1 291RL "Harvey'
Biggles607 is offline   Reply With Quote
Old 03-10-2018, 06:43 AM   #8
Site Team
 
Join Date: Dec 2007
Location: WI.
Posts: 9,162
If you can get at the zerks readily, it dosen't make any difference whether they are positioned in, or outside the wheel. You have to, or should, wipe them off with a grease rag before you grease them. There is always going to be grime on them, no matter where they are.
Lloyd is offline   Reply With Quote
Old 03-11-2018, 07:24 AM   #9
Weekend Camper
 
Join Date: Dec 2016
Location: PA
Posts: 40
Great write up! Thank you for sharing this.
CampBannon is offline   Reply With Quote
Old 03-11-2018, 11:17 AM   #10
Site Team
 
mark5w's Avatar
 
Join Date: Sep 2012
Location: PA
Posts: 5,724
My concern on questioning the way the bolts were installed is easy access to the zerk fitting. I know that some are covered up by the tire.
__________________
Mark & Susan
Lehighton, Pennsylvania

EAGLE HT FIFTH WHEEL | 30.5CKTS - '13 Ford F150 SCREW - PullRite Superslide - Roadmaster Active Suspension
Member - "Northeast Adventures RV Rally Group" & "Mason-Dixon Bunch"
mark5w is offline   Reply With Quote
Old 03-11-2018, 11:53 AM   #11
Seasonal Camper
 
Biggles607's Avatar
 
Join Date: Jan 2017
Location: Florida
Posts: 389
Mark,

I hope this allays your concerns.


__________________
Biggles
2015 Toyota Tundra Dbl Cab 5.7 V8
2017 Zinger Z-1 291RL "Harvey'
Biggles607 is offline   Reply With Quote
Old 03-11-2018, 12:51 PM   #12
Site Team
 
mark5w's Avatar
 
Join Date: Sep 2012
Location: PA
Posts: 5,724
Thanks for the pics, assures me that I can grease them from the outside.
__________________
Mark & Susan
Lehighton, Pennsylvania

EAGLE HT FIFTH WHEEL | 30.5CKTS - '13 Ford F150 SCREW - PullRite Superslide - Roadmaster Active Suspension
Member - "Northeast Adventures RV Rally Group" & "Mason-Dixon Bunch"
mark5w is offline   Reply With Quote
Old 03-12-2018, 02:33 PM   #13
Site Team
 
mark5w's Avatar
 
Join Date: Sep 2012
Location: PA
Posts: 5,724
Quote:
Originally Posted by Biggles607 View Post
Thanks Mark,

You're absolutely correct in that I did consider installing the zerk fitting on the inside. However, once I started doing the installation, I realized I can get to all of them easily with my grease gun this way.

What time should I come over......do I need to bring any tools?
Well, it's like this. We expect another 2-4" of snow again tonite. That way it's going, I won't get to this project until we get a heat wave.

I do have all the tools, so just bring yourself and tell me what type of 'cooling off" drink you like.
__________________
Mark & Susan
Lehighton, Pennsylvania

EAGLE HT FIFTH WHEEL | 30.5CKTS - '13 Ford F150 SCREW - PullRite Superslide - Roadmaster Active Suspension
Member - "Northeast Adventures RV Rally Group" & "Mason-Dixon Bunch"
mark5w is offline   Reply With Quote
Old 03-12-2018, 06:44 PM   #14
Seasonal Camper
 
Biggles607's Avatar
 
Join Date: Jan 2017
Location: Florida
Posts: 389
Judging by the weather up there I think equal parts, Brandy, Honey & Hot water with a squeeze of lemon might be a good start.....

Keep warm, stay safe.
__________________
Biggles
2015 Toyota Tundra Dbl Cab 5.7 V8
2017 Zinger Z-1 291RL "Harvey'
Biggles607 is offline   Reply With Quote
Old 03-12-2018, 08:07 PM   #15
Weekend Camper
 
Steve and Char's Avatar
 
Join Date: Jul 2016
Location: CT.
Posts: 82
One of the better upgrades you can do as we all know the wear on the originals. Factory just does not want to use quality.
Piece of mind knowing what you are riding on after you replace.
I might have posted this before but I also did a few upgrades. Just have not got to the disk breaks yet.

Steve
Attached Images
File Type: jpg 003.JPG (31.5 KB, 132 views)
__________________
2014 36FL Redwood pulled by 2015 GMC Denali 3500
Steve and Char is offline   Reply With Quote
Old 03-13-2018, 06:22 AM   #16
Site Team
 
Join Date: Dec 2007
Location: WI.
Posts: 9,162
Quote:
Originally Posted by mark5w View Post
Well, it's like this. We expect another 2-4" of snow again tonite. That way it's going, I won't get to this project until we get a heat wave.

Don't put your shovel away, they are saying you've got another round coming this weekend.
Lloyd is offline   Reply With Quote
Old 03-13-2018, 06:35 AM   #17
Site Team
 
Join Date: Dec 2007
Location: WI.
Posts: 9,162
Quote:
Originally Posted by Steve and Char View Post
One of the better upgrades you can do as we all know the wear on the originals. Factory just does not want to use quality.
Piece of mind knowing what you are riding on after you replace.
I might have posted this before but I also did a few upgrades. Just have not got to the disk breaks yet.

Steve
Steve, did you add the shocks at the same time you did the other components on the suspension, or was it a two step process? Reason I ask is I wondered if you could tell much difference with the shocks.
Lloyd is offline   Reply With Quote
Old 03-13-2018, 04:21 PM   #18
Weekend Camper
 
Steve and Char's Avatar
 
Join Date: Jul 2016
Location: CT.
Posts: 82
Quote:
Originally Posted by Lloyd View Post
Steve, did you add the shocks at the same time you did the other components on the suspension, or was it a two step process? Reason I ask is I wondered if you could tell much difference with the shocks.
Yes, I did the shocks about 3 months later and it made a huge difference. We can leave most everything on the counters now and don't even move.

Steve
__________________
2014 36FL Redwood pulled by 2015 GMC Denali 3500
Steve and Char is offline   Reply With Quote
Old 03-14-2018, 04:41 AM   #19
Seasonal Camper
 
Biggles607's Avatar
 
Join Date: Jan 2017
Location: Florida
Posts: 389
Oh me likey.......shock absorbers.
__________________
Biggles
2015 Toyota Tundra Dbl Cab 5.7 V8
2017 Zinger Z-1 291RL "Harvey'
Biggles607 is offline   Reply With Quote
Old 03-14-2018, 08:51 AM   #20
Family Vacation Member
 
moore_rvers's Avatar
 
Join Date: Feb 2017
Location: VA
Posts: 113
Quote:
Originally Posted by Biggles607 View Post
Hands up all those who have undertaken something that looks like to should take a couple of hours and it ended up taking all day…….?
Ummm. I didn't raise my hand. I NEVER have a problem. Everything always goes as planned and I never even break a nail.

I have not seen these Biggles. I really like this and I am absolutely going to install them. I'm glad you posted this.
I am also installing airbags on my rear suspension on my truck. I was going to install helper springs but I think I like the airbag idea better. But it's a trial and error thing. We will see.
__________________
John & Kathy Moore
Maggie the Paparanian and Sammie the Aussie Healer
Stafford, VA

2016 Crossroads 291 RL Z-1
2015 Dodge Ram 1500 5.7L Hemi Outdoorsman
www.wildlifeupclose.com
moore_rvers is offline   Reply With Quote
Reply


Posting Rules
You may not post new threads
You may not post replies
You may not post attachments
You may not edit your posts

BB code is On
Smilies are On
[IMG] code is On
HTML code is Off
Trackbacks are Off
Pingbacks are Off
Refbacks are Off


» Featured Campgrounds

Reviews provided by

Powered by vBadvanced CMPS v3.2.3
Disclaimer:

This website is not affiliated with or endorsed by Crossroads RV or any of its affiliates. This is an independent, unofficial site.


All times are GMT -6. The time now is 05:09 PM.


Powered by vBulletin® Version 3.8.8 Beta 1
Copyright ©2000 - 2024, vBulletin Solutions, Inc.
×