|
 09-23-2014, 05:02 AM
|
#1
|
|
Weekend Camper
Join Date: Sep 2014
Location: MI
Posts: 11
|
Carpet Replacement in a 2013 Jefferson
Hello all, first time poster here. I am thinking about replacing the carpet in my camper. I have no illusions about being able to do it myself, so I'll be hiring the work out. I know a really good carpet layer, but RV's aren't his normal area of work.
Has anyone been down this road with a similar Rushmore? If I can talk him into doing it, I'd like to be able to give him as much info as I can about the how the current carpet is attached and what goes into installing the new stuff.
OR...
Should I seek out someone who works on a regular basis with RV's for this sort of job?
|

|

|
|
09-23-2014, 06:40 AM
|
#2
|
|
Full Time Camper
Join Date: Jul 2006
Location: MS
Posts: 2,746
|
Do a search, there are several, who have replace their carpet with new carpet or Laminate
__________________
Frank and Janet Henn
2000 Monoco Lapalma
being pushed by a 2004 Jeep Grand Cherokee
Traveling with Rainbow the wonder dog and now with Sunshine the rescue Schnauzer.
|
|
|
|
|
09-23-2014, 04:25 PM
|
#3
|
|
Full Time Camper
Join Date: Oct 2004
Location: Texas
Posts: 1,508
|
While I can't say specifically about the Rushmore, typically the carpet is put down before the walls are placed, meaning it runs under the walls and will have to be cut along the walls. This is different than house installations. Otherwise it is held in place with hundreds of small staples. No tack strips are used, so that is different also. Probably no carpet pad either. Finally, there may be a few places, like in the bedroom area where it covers exposed steel and is just glued in place.
It will take a lot more time to remove the old carpet and all the staples than installation of new carpet, so you might do the removal yourself. Also, at the edges, the carpet will need to be folded over and then stapled, therefore, many carpets will be too thick or too stiff to work well for an RV installation.
__________________
Larry Day
Texas Baptist Men-Retiree Builders member since '01
13 Silverado 3500HD D/A, 2wd CCSB srw, custom RKI bed
11 Cruiser CF32MK
https://www.picturetrail.com/dayle1
|
|
|
|
|
09-24-2014, 04:00 AM
|
#4
|
|
Weekend Camper
Join Date: Sep 2014
Location: MI
Posts: 11
|
Thanks guys, I see from the thread below that this may be something I could try myself. I'm pretty handy around the house, but I've always relied on professionals for my carpet laying needs.
I called Crossroads yesterday and they confirmed that the carpet is stapled to the floor. I should have asked for more clarification but my assumption is that if this is the case, there is no tack strip at the edges and the stretching process that would take place in a sticks and bricks house doesn't apply here. Correct?
I like the OP (I'm going to message him) of the post below idea of using the carpet he cut out as a template for the new stuff he's going to staple in. I've installed a fair amount of ceramic tile and I always have a few cardboard templates around of the tile to cut out to use for intricate cuts.
http://www.crossroadsowners.com/foru...ghlight=carpet
|
|
|
|
|
09-24-2014, 01:11 PM
|
#5
|
|
New Camper
Join Date: Sep 2014
Location: Iowa
Posts: 1
|
I can tell you, you will have to have the slide out pc's bounded at the edges. It is not a easy task, might be worth it to pay a installer a few hundred to install. Just saying from experiance. 
|
|
|
|
|
09-24-2014, 06:48 PM
|
#6
|
|
Full Time Camper
Join Date: Oct 2004
Location: Texas
Posts: 1,508
|
Quote:
Originally Posted by jschemist

the stretching process that would take place in a sticks and bricks house doesn't apply here. Correct?
I like the OP (I'm going to message him) of the post below idea of using the carpet he cut out as a template for the new stuff he's going to staple
|
You are right, you can't use a wall-to-wall stretcher, but a knee kicker would be helpful. I doubt the old carpet will make a decent template, you will stretch and tear it getting it out due to all the staples. It will take a lot more time to 'save' the carpet than to make a better template for the difficult areas. But you probably don't need any template, instead you will need to fold about 1 inch under at the edges to prevent fraying and then stapling it.
__________________
Larry Day
Texas Baptist Men-Retiree Builders member since '01
13 Silverado 3500HD D/A, 2wd CCSB srw, custom RKI bed
11 Cruiser CF32MK
https://www.picturetrail.com/dayle1
|
|
|
|
|
09-24-2014, 07:42 PM
|
#7
|
|
Weekend Camper
Join Date: Sep 2014
Location: MI
Posts: 11
|
Quote:
Originally Posted by Dayle1
You are right, you can't use a wall-to-wall stretcher, but a knee kicker would be helpful. I doubt the old carpet will make a decent template, you will stretch and tear it getting it out due to all the staples. It will take a lot more time to 'save' the carpet than to make a better template for the difficult areas. But you probably don't need any template, instead you will need to fold about 1 inch under at the edges to prevent fraying and then stapling it.
|
Dayle1, when you mention folding the carpet under at the edges, are you talking about edges where the carpet meets a wall, or where it meets an open area? In my unit (rear living), this would be where the carpet from the living area meets the vinyl of the kitchen. Or do you fold it over both places? Obviously, I haven't done this before, but it seems to me like that could be a little too thick, even with a short pile carpet. Can anything be done to mitigate this?
Nicky, I'm brave enough to try laying this carpet myself, but not so much to try to bind the edges for the slideouts on my own. I'm sure there is someone locally who can handle that for me.
|
|
|
|
|
09-25-2014, 06:36 PM
|
#8
|
|
Full Time Camper
Join Date: Oct 2004
Location: Texas
Posts: 1,508
|
Both places and the difficulty of folding the carpet is the reason most higher quality carpets are not good candidates. Only option is to use a carpet with backing that is not just woven fabric, because it will unravel. A rubber coated backing will work or something similar. Potentially you could add a rubber coating to a plain woven backed carpet.
__________________
Larry Day
Texas Baptist Men-Retiree Builders member since '01
13 Silverado 3500HD D/A, 2wd CCSB srw, custom RKI bed
11 Cruiser CF32MK
https://www.picturetrail.com/dayle1
|
|
|
|
|
09-25-2014, 07:22 PM
|
#9
|
|
Site Team
Join Date: Sep 2012
Location: PA
Posts: 5,723
|
Easiest alternative to professional binding: 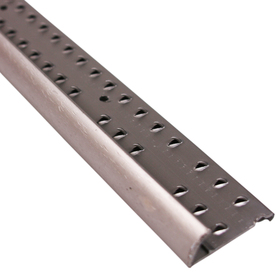
Nail to floor and using rubber mallet bend to bind. Only problem is that it can only be used in straight runs. And will not work for slides. But they do sell another product for that. http://www.homedepot.com/p/Instabind...4SGE/204693813
Metal ones are available at Lowes. http://www.lowes.com/ProductDisplay?...llow&cId=PDIO1
__________________
Mark & Susan
Lehighton, Pennsylvania
EAGLE HT FIFTH WHEEL | 30.5CKTS - '13 Ford F150 SCREW - PullRite Superslide - Roadmaster Active Suspension
Member - "Northeast Adventures RV Rally Group" & "Mason-Dixon Bunch" |
|
|
|
|
09-30-2014, 08:32 AM
|
#10
|
|
Family Vacation Member
Join Date: Jan 2009
Location: DeSoto,KS
Posts: 125
|
We replaced ours last winter. It is not to bad, just a lot of staples. We used the transition strip in the main area that mark5w showed. You can make bends in it by cutting slots in the back side. On the slide carpet we used Instabind and it worked great.
The only really hard part was under the booth.
We went to a carpet place and got a remnate. The lower the nap the easier it will be. Stay away from loops or berbers.
__________________
2009 CT31RL
2016 Chevrolet 2500HD High Country
Hensley Hitch
|
|
|
|
|
10-20-2014, 08:51 AM
|
#11
|
|
Weekend Camper
Join Date: Sep 2014
Location: MI
Posts: 11
|
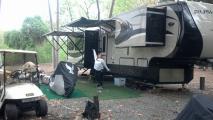
In case anyone was interested (now or in the future), I finished this job myself over the weekend.It took a few weeks working on it a few hours at a time on weekends-my camper is ~80 miles from where I live.Here are a few points that may be helpful for someone attempting a similar project.Im really happy with the way it turned out.Looks better than new, IMO. I bought everything from the local Menards. The carpet I got was one of the nicer ones they keep in stock. Normally 1.59/sq ft, I got it for 1.29. The pad was 49 cents a square foot-8 lb, 3/8" thick with a moisture barrier on one side.
When the camper was built the carpet was put down, then, the camper walls were put into place as well as all of the heavy built in cabinetry-including the bed and entertainment center. No tack strips anywhere. It was stapled near the perimeter of the walls and that was that. This made it reasonably difficult to get a clean cut at the edge to pull the old carpet out, but it wasn't impossible. In the 2 slides that had carpet, it was very easy to remove as it was just stapled down after the slide was built. Under the double fridge there is a couple square inches of old carpet I couldnt get to. I doubt anyone will ever notice. I also didnt replace the carpet in the front bedroom closet.Its never been walked on and the door will always be closed, so I figured Id leave it be.I have enough carpet to do it, maybe I will some rainy weekend next summer.
Doing the stairs was horrible. They took a lot of time, mostly because there were curves on them and I couldnt pull the old carpet up without it being destroyed-no template to use.
I was able to keep the carpet in-tact when I pulled the old stuff out. This was very helpful for cutting templates of the new carpet. I cut them a little bigger, then, trimmed to fit when installing the carpet. I wasnt sure if Id want to fold the carpet over at the edges, so thats part of the reason I cut them a little bigger. In retrospect, Im not sure that was needed-see next point for details.
I went with a slightly thicker pile carpet, this gave me some forgiveness where the carpet meets the wall.I had originally planned to fold everything over at the perimeter, but when I saw how good it looked simply butting the carpet right up to the wall, thats the way I did it. Had I used a berber, I doubt I could have gotten away with that.
I bought a $25, knee kicker from Menards for the project. I probably could have done the job without it, but it was handy on a couple occasions.
I folded the carpet over in the 2 spots where it met the vinyl flooring. I was surprised how good this turned out. Looks real nice at these transitions.
No issues with the slides catching the carpet when I close the place up. One place I was a little worried about this, I bought an $11, 6 transition strip youd use for going from carpet to vinyl .I put this under the bound edge of the carpet on the slide so its out of sight and removes the chance of the slide catching the carpet when closing.
I had a local carpet shop bind the edges of the carpet for the slides. $2.50 a lineal foot. Cost me ~$40 total for the 2 pieces that need it and it looks very nice.
I might have been happier without this piece of knowledge, but I found a small leak where the slide meets meet the wall. Doesnt look to be leaking very much, so I might never have noticed it had the carpet not been pulled up and I spent a day in the rain working on it. Getting that figured out will be the next project.
|
|
|
|
|
10-26-2014, 03:37 PM
|
#12
|
|
Full Time Camper
Join Date: Jan 2013
Location: Richland. Wa.
Posts: 624
|
Congratulations on a job well done.
Gary
__________________
1998.5 Dodge 3500 4X4 Black Bart. 150k
2013 Rushmore Jefferson
2008 Raptor 299 toy hauler
Ruby & Jade. English Springer Spaniels
|
|
|
|
|
10-26-2014, 05:46 PM
|
#13
|
|
Full Time Camper
Join Date: Aug 2010
Location: , RI
Posts: 1,164
|
Nice work and informative post. Thanks. Enjoy your improvements.
__________________
Al Laura (Lily & Breeze Portie Girls)
2011 F250 6.7 PS Tuxedo Black 4x4
11 305SKP- TPMS- RideRite air bags
Reese 16K Slider Wet Bolts
|
|
|
|
|
10-27-2014, 07:30 AM
|
#14
|
|
Seasonal Camper
Join Date: Feb 2014
Location: New Mexico/ Calif
Posts: 312
|
Sounds great. So when do we get some pics of the finished project
And when do you want to do mine.
My wife hates the carpet in our Jefferson
__________________
2013 Jefferson
2006 Chev 3500 DRW
2009 Corvette
Tony & Joanne
Full Time
|
|
|
|
|
10-27-2014, 05:49 PM
|
#15
|
|
Weekend Camper
Join Date: Sep 2014
Location: MI
Posts: 11
|
I'll have to get some pictures this weekend when I go to winterize it. I should have taken them as I was doing it, but I get pretty single minded on finishing the job at hand. As soon as I'm done I wish I would have taken a couple minutes to snap some photos as I was going.
|
|
|
|
|
10-27-2014, 05:58 PM
|
#16
|
|
Full Time Camper
Join Date: Aug 2010
Location: , RI
Posts: 1,164
|
Quote:
Originally Posted by jschemist
I'll have to get some pictures this weekend when I go to winterize it. I should have taken them as I was doing it, but I get pretty single minded on finishing the job at hand. As soon as I'm done I wish I would have taken a couple minutes to snap some photos as I was going.
|
Been there done that. You get focused and and that is how things get done.
__________________
Al Laura (Lily & Breeze Portie Girls)
2011 F250 6.7 PS Tuxedo Black 4x4
11 305SKP- TPMS- RideRite air bags
Reese 16K Slider Wet Bolts
|
|
|
|
|
 Posting Rules
|
You may not post new threads
You may not post replies
You may not post attachments
You may not edit your posts
HTML code is Off
|
|
|
|
 » Recent Threads
 |
|
|
|
|
|
|
|
|
|
|
|
|
|
|
|
|
|
|
|
|
|
|
|
|
|
|
|
|
|
|
|


 Linear Mode