|
 03-31-2012, 03:11 AM
|
#1
|
|
Seasonal Camper
Join Date: Feb 2012
Location: minnesota
Posts: 365
|
What are people doing to help aid in finding the level on an RV when setting up camp? With my old unit I would walk around with a two foot bubble level and check the bottom of a window on a long side, the back bumper, window on the other side and across the front A frame in front.
I always wondered if the attachable levels work. Or what options do I have.
The hand held level works fine so I could always stick with that..
|

|

|
|
03-31-2012, 03:18 AM
|
#2
|
|
Full Time Camper
Join Date: Jun 2011
Posts: 1,012
|
On mine I have a large bubble level mounted on the hitch that is visible from inside the cab. That takes care of left to right. I set that before unhooking. Then when unhooked I have a 2' level in the compartment where the front jack controls are. I put it on the lip of the compartment and level front to back with the front jacks. Then lower the rear jack for stability and run out the slides.
Before using the level in the compartment I had gone all over the trailer and checked levels everywhere and found the inside lip of the compartment door was in agreement with the rest of my check points.
__________________
Clif and Millie
Ozzie (half a dog tall & 2 dogs long)
Mabank, TX
2009 Ford Lariat F350 SRW CC Diesel
2013 Cruiser CF305SK Patriot Edition
|
|
|
|
|
03-31-2012, 03:28 AM
|
#3
|
|
Family Vacation Member
Join Date: Jun 2011
Location: Texas
Posts: 198
|
I do the same as Clif, I check side to side and level, then unhook and then level front to back.
I have bought a large level to attach to the front cap but have not decided it I want to do that.
|
|
|
|
|
03-31-2012, 08:19 AM
|
#4
|
|
Site Team
Join Date: Dec 2007
Location: WI.
Posts: 9,160
|
When we first got the 5er, I backed it in the shed on the cement floor
and figuring that was probably about as level as it needed to be for side to side. Leveled it up front to back, put a
stick on bubble level on the side and one on the front. That is what I
; by, and don't have to run around with a two foot level any more.
|
|
|
|
|
03-31-2012, 10:51 AM
|
#5
|
|
Seasonal Camper
Join Date: Feb 2011
Location: League City, TX
Posts: 265
|
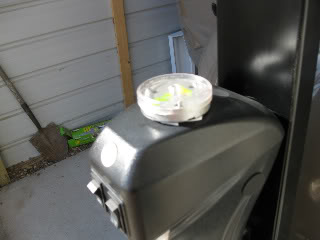
About the same as Avvidclif, got one from Wally World and mounted it on the pin box where I can see it in the rear-view mirror; each hash mark is about 1" so we know how much to block for side to side. Our unit has the Intellijacks system so fore/aft is pretty simply...just push the button and it levels by itself.
|
|
|
|
|
03-31-2012, 11:01 AM
|
#6
|
|
Full Time Camper
Join Date: Nov 2011
Location: WI
Posts: 896
|
Ditto to what Lloyd did...and it works well for me that way. 
Jim
__________________
Jim & Linda Tator
Watertown, WI
2013 Crusier CF34SS GMC 3500 8.1L Dually
154 nights in 2013 - 4,370 miles
178 nights in 2014 - 5,082 miles
365 nights in 2015 - 6,040 miles
|
|
|
|
|
04-01-2012, 01:05 AM
|
#8
|
|
Seasonal Camper
Join Date: Feb 2012
Location: minnesota
Posts: 365
|
Thanks All 
|
|
|
|
|
04-01-2012, 02:12 AM
|
#9
|
|
Family Vacation Member
Join Date: Feb 2009
Location:
Posts: 160
|
But wait, there's more. I use a short torpedo level and place it on the kitchen counter. When I raise an edge up to see how out of level it is, that measurement tells me how many blocks to put under which side.
|
|
|
|
|
04-01-2012, 03:58 AM
|
#10
|
|
Full Time Camper
Join Date: Jun 2011
Posts: 1,012
|
Oh, I forgot one important step. After setting the side to side level and before unhooking I place the tire locks between the tires so it doesn't move. Then unhook and set the front to back. At that point I take care of the rest of the outside hookup and the DW goes into the trailer to do her stuff.
__________________
Clif and Millie
Ozzie (half a dog tall & 2 dogs long)
Mabank, TX
2009 Ford Lariat F350 SRW CC Diesel
2013 Cruiser CF305SK Patriot Edition
|
|
|
|
|
04-01-2012, 04:20 AM
|
#11
|
|
Seasonal Camper
Join Date: May 2010
Location: Coupeville, WA
Posts: 355
|
Boy Cliff do you have that all wrong! I level side to side, set the wheel locks, level front to back and then let the DW finish setting up while set up the lawn chairs and then have a brewski 
|
|
|
|
|
04-01-2012, 04:21 AM
|
#12
|
|
Seasonal Camper
Join Date: May 2010
Location: Coupeville, WA
Posts: 355
|
Oh wait I forgot one thing, my wife doesn't read this forum 
|
|
|
|
|
04-01-2012, 08:28 AM
|
#13
|
|
Family Vacation Member
Join Date: Dec 2011
Location: mountain home
Posts: 144
|
What I did was to install a Two way Level on top of my jack callibrated at home on my shop floor and sence 90 % of the time I will be in a RV park with good pads this works for me .
|
|
|
|
|
04-02-2012, 02:38 AM
|
#14
|
|
Full Time Camper
Join Date: Nov 2011
Location: WI
Posts: 896
|
I went out yesterday with my 2' level and checked everything inside and out...it seems the "sticky levels" the ones put on by my dealer are off a little...does anyone know if there is an easy (I'm sure that is an overused word here LOL) way to take them off and put new ones on. They do not have to be adjust a lot so I can put the new ones in the same spot the old ones were in I just don't know what removing them will do to the finish on the trailer. Is there an adhesive remover that works better or do I just use an old razor blade to do it.
thanks in advance,
Jim
__________________
Jim & Linda Tator
Watertown, WI
2013 Crusier CF34SS GMC 3500 8.1L Dually
154 nights in 2013 - 4,370 miles
178 nights in 2014 - 5,082 miles
365 nights in 2015 - 6,040 miles
|
|
|
|
|
04-02-2012, 02:44 AM
|
#15
|
|
Site Team
Join Date: Dec 2007
Location: WI.
Posts: 9,160
|
Jim, I use "Goo Gone" to take off that sticky residue. Should be able to get it in a grocery store.
|
|
|
|
|
04-02-2012, 04:07 AM
|
#16
|
|
Full Time Camper
Join Date: Nov 2011
Location: WI
Posts: 896
|
Lloyd,
Thanks, I actually think I have some in the garage  I'll head out to give it a try.
Jim
__________________
Jim & Linda Tator
Watertown, WI
2013 Crusier CF34SS GMC 3500 8.1L Dually
154 nights in 2013 - 4,370 miles
178 nights in 2014 - 5,082 miles
365 nights in 2015 - 6,040 miles
|
|
|
|
|
04-02-2012, 05:43 AM
|
#17
|
|
Family Vacation Member
Join Date: Dec 2011
Location: mountain home
Posts: 144
|
Hi Jim you can try a hair dryer to to make the tape give a little if you just take it slow it will let you move they if you only need a little.
Tim
|
|
|
|
|
04-02-2012, 05:50 AM
|
#18
|
|
Full Time Camper
Join Date: Nov 2011
Location: WI
Posts: 896
|
Tim,
Thanks, I got it removed with the razor-scraper and the Goo Gone did the job. The level is still in good shape so I need to see if they sell that sticky-back stuff to put it back on with LOL
thanks again,
Jim
__________________
Jim & Linda Tator
Watertown, WI
2013 Crusier CF34SS GMC 3500 8.1L Dually
154 nights in 2013 - 4,370 miles
178 nights in 2014 - 5,082 miles
365 nights in 2015 - 6,040 miles
|
|
|
|
|
04-03-2012, 03:40 AM
|
#19
|
|
Family Vacation Member
Join Date: Feb 2009
Location:
Posts: 160
|
Quote:
|
Originally Posted by tator447
I went out yesterday with my 2' level and checked everything inside and out...it seems the "sticky levels"Â* the ones put on by my dealer are off a little...does anyone know if there is an easy (I'm sure that is an overused word here LOL) way to take them off and put new ones on.Â* They do not have to be adjust a lot so I can put the new ones in the same spot the old ones were in I just don't know what removing them will do to the finish on the trailer.Â* Is there an adhesive remover that works better or do I just use an old razor blade to do it.
Â*
thanks in advance,
Jim
|
I would have just marked with permamarker where the bubble was when it is level. The key is to be able to look at something and know when to stop leveling. IMHO
|
|
|
|
|
04-03-2012, 09:32 AM
|
#20
|
|
Weekend Camper
Join Date: Mar 2010
Location: MI
Posts: 80
|
Here is how I have leveled all my trailers, starting with my popup, and I don't use a level. While hooked up, I have my DW get a can of beer out of the fridge, and set it on the floor so it rolls side to side. If it rolls, I put a 2X6 under the side that is low until the rolling is minimal or stops. Then I unhitch, and repeat the same procedure front to back. Then I drain all the fluid out of my leveling device and save the can. (I recycle)
I always use the floor because it is closest to the frame. I have found countertops not to always be parallel to the floor.
__________________
Jerry & Jane
2008 GMC 2500HD Duramax
2009 Cruiser 30SK Patriot
|
|
|
|
|
 Posting Rules
|
You may not post new threads
You may not post replies
You may not post attachments
You may not edit your posts
HTML code is Off
|
|
|
|
 » Recent Threads
 |
|
|
|
|
|
|
|
|
|
|
|
|
|
|
|
|
|
|
|
|
|
|
|
|
|
|
|
|
|
|
|


 Linear Mode